Support > Settings > CANDDi Tag FAQs
CANDDi Tag FAQs
Tags are ‘properties’ of Contacts. They describe certain actions a Contact has undertaken. They include things like ‘identified’ or ‘logged_in’, but you can also tag people with things like their rough geographic location. You can then see all visitors who came from ‘Atlanta, GA, USA’ or ‘Edinburgh, Scotland’. You can then use these tags to build CANDDi Streams in order to view Contacts with specific filters.
How to create tags
Tags can be added to a Contact in two different ways:
Manually, using the contact view. Simply load a contact, find the tag tab on the screen, type a tag in the input box and press add. This will add a tag to one Contact. You will need to view the tags in a list view for you to add a tag.
Automatically using the Site Tagging Settings. This allows you to tell CANDDi to automatically add a tag to a Contact once they have done a specific action. For example: when a Contact has visited your “contact us” page then they could automatically be given the tag ‘contact_us_page’.
Addings tags to a specific page
If you want to see everyone who has been to your contact page; everyone who has completed an enquiry form; or everyone who has passed the first step in your 3 steps registration process, CANDDi makes this easier with the Site tagging settings.
You can access it directly from the Settings tabs of your CANDDi dashboard, just look under the site management section and click site-tagging individual.
Or you can click through from the activity view in a visitor profile (clicking on the blue pen icon next to a URL).
If you are coming from the Setting > Site Tagging - Individual menu then you will need to input the URL you want to tag in the search box. If you are coming from a click on the activity view in a profile then the URL will be pre-filled.
Choose the ‘Tags’ tab, then ‘Add Tag’ and type in the name of the tag. Click the green tick button to the right afterwards.
Once saved, all the new visitors to that page will have the tag added to their profile. You can then create streams based on visitors having (or not having) visited these pages.
Tags Management Dashboard
In CANDDi, you can change the colours of your visitors’ profiles. This is done through Tag management, where you can assign a particular colour to a particular tag, for example: your prospects to be blue; clients to be green; and competitors to be red. The Tags Management dashboard is also used to create, edit and delete all the tags you are currently using.
To alter the colours, go to settings > Tags management.
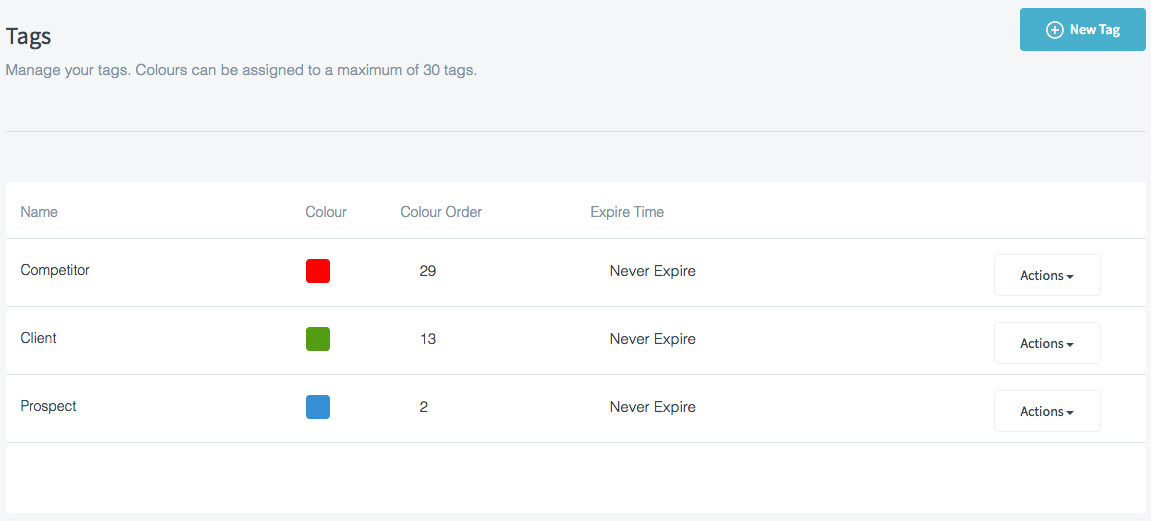
Find your desired tag and click the square in the colour column to bring up a colour chart. Once you make your selection, do not click the cross in the corner as that will clear your selection. Just click outside the colour picker box and the colour will be updated.
You can also give your tag a colour order, which decides the display priority. The higher the number, the more priority it has. For example: when a prospect becomes a client, CANDDi will prioritize the green over the blue.
Sometimes you might find it useful to give your tag expiry time parameters, for example: to tag visitors who were on your website within the last 30 days (NOTE: anything longer than seven days will need to be input in seconds through the option ‘other’ when you click on ‘Never Expire’).
Pushing tags into CANDDi through the tracker
Many CMS platforms support automatic (or user generated) page tagging. With a little Javascript trickery, these tags can be automatically pushed into CANDDi, and on to Contact profiles.
The following script block needs to be pasted into the body of your web-page. This needs to be positioned above the script to load the CANDDi tracker.
<script type="text/javascript">
window.canSet = {
Settings : {
TagsAdd : ["Tag1", "Tag2"],
TagsRemove : ["tag3", "tag4"]
}
};
</script>